Saturday, August 4, 2012

Tile Coasters for Brandy

Last year Brandy starting taking ballet and I loved that she was doing something completely for herself that she loved.  When I saw the Aspire stamp from CTMH, I knew I had to use it to make something for her.  So, thanks to my wonderfully creative and talented up line, Joy..who I first saw make theses...a made her a set of Tile Coasters.  Here's a pic of one:

They were soooo simple to make.  I picked up a pack of tiles from Home Depot, stamped the images with StazOn ink and then sprayed with a clear sealer.  Waala!  Done. They were so fast and easy, I made a set for me and a set for her. 

Until next time,

Becca

Birdhouses

I wanted to share a couple of projects I completed this weekend.  These cute little spring birdhouses. 

Shabby Chic.  I am using this for my pens at my desk.

I used primary colors for this one.  Love the little bird with glasses.  I may use this for a little gift for Noah before school starts.  :)

I loved, loved, working on these projects!  I downloaded the file from SVG Cuts.  It is their Spring Birdhouse set.  I used my paper stash and cut the shapes using my Eclips Machine.  I am having so much fun with it!  I literally use it every time I create.  So much fun.  Sorry the pics aren't great but I think you get the idea.

Until next time,
Becca

Wednesday, August 1, 2012

Decorating Birthday Hats

As promised, another post. 

I thought I would share with you a few pics of everyone decorating thier own birthday hats for Brandy's party.  It's kind of corny but Brandy actually called my on her way home and said that she had a really good time doing that.  That's all I needed to know.

I downloaded the file from SVG Cuts, it is included in thier Happy Birthday To You Set.  I cut the shape using my Eclips and white cardstock.  I put a few crafty items out and let everyone go.  It was interesting what everyone came up with. 

Everyone busy punching shapes and using the shape scissors to cut.  Yes, crafters you can still use your shape scissors!


Even my 85 year old father in law was getting into the fun!

Ella with her hat! She made it all by herself!

Brandy made mine :)

Savannah's beautiful hat.


All the grandkids with thier hats.  Even Josh was a sport wearing his.  :) 

Until next time,

Becca

Sunday, July 29, 2012

A Lever Card for Brandy

It has literally been 4 months since my last post!  wow!  although I haven't posted in my blog please don't think I haven't been creating.  Just the opposite, I have been spending lots of time in "my room" creating.  I just haven't been sharing much.  But these last few creations warrant a blog post so here goes.  And to get my post numbers up a bit I am scheduling a few post over the next few days... or maybe weeks.  We'll see how it goes. 

The first thing I wanted to share was this cute card I made for my daughters b-day.  It's actually a lever card.  Sorry, I didn't get a pick on the inside.  I downloaded the template from SVG Cuts in thier HappyB-DayToYou set. Enjoy.
Lever Card -SVG Cuts

Until next time,

Becca

Thursday, March 8, 2012

Saturday, February 4, 2012

I just realized this week how neglectful I have been to post on my blog!  There's just not enough time in the day to create much less post it on my blog...but I have been creating!  And having lots of fun too. 

Here is my latest She Art Journal Girl..

I used paints, stencils and stamps to create the background and pattern paper to create the January Girls dress.  The only thing I lack to have this piece finished is the she art phrase...I not set on that yet. 

I'm also taking another online workshop...I love the convenience of taking these.  In this workshop I am learning how to make "pretty faces".  You can check it out here.  Here's a sample of what I've made with my own twist on it...

Ok, I know what you're thinking..."I thought you said pretty face"  and I totally agree with you...this is one of my first and the proportions are wayyyyyy off.  But, I turned it into a piece of art in my journal.  That's one thing I love about my journal...there are not mistakes.  In a later post I will show you a "pretty face" that I'm proud of.  I can hardly believe I drew it myself. 

I have not left the scrapbook world.  I've also been working on a Christmas mini.  Here's a sampling of that. 


So you can see, I have not left the creative world.  Just haven't shared much.
I hope you've enjoyed looking and I hope you have a wonderfully creative day.  My grands are coming over today, so I know I'll have a blast!

Happy Scrappin'

Becca

Tuesday, December 20, 2011

Art Journal Doodles

I completed this page in my art journal today.  It's a page that I worked on as I hung out watching the tube with hubby.  I just doodles lots of vines and flowers and a few random designs.  Today I filled it with color using distress inks and alcohol markers.   I hope you enjoy looking at it and I'd love to read your comments. 

this is what it look like when you open the book...a double page spread

On this page i doodled a variety of flower designs.  i was just experimenting to see what I could come up with.

The arches on this page were actually my starting point.  At first I thought I would fill the whole page with the arch design but I was unhappy with how they were coming out.  I then left the arch and began the flowers and swirls.  I really like the completed page. 

Sunday, December 18, 2011

Christmas Card 2011 Number 4

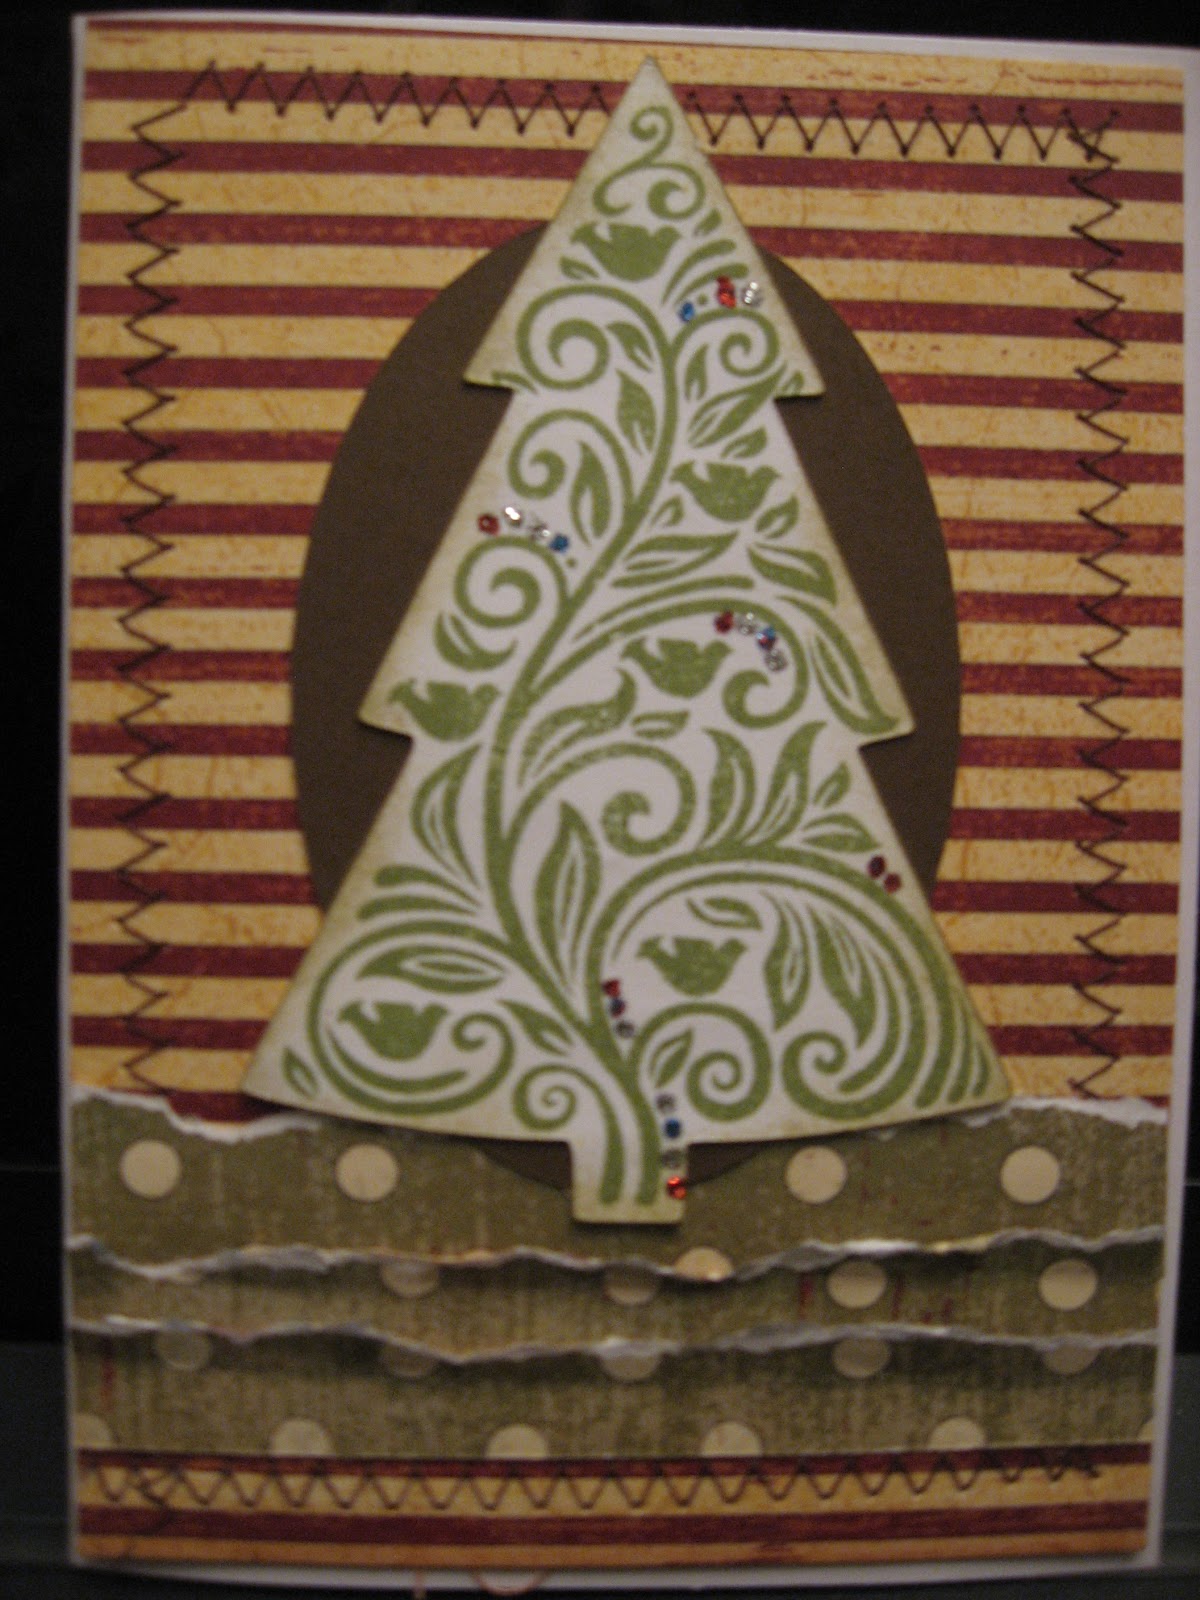
I love techniques and making cards is a wonderful way to experiement with lots of them and get fast results.  On this card I used torn paper layers, stitching and a bit of bling to create a very pretty card that I think the recipent will enjoy. 

This card only took a few minutes to create and the end result is nice.  I used my Art Philosophy Cartridge to cut the tree shape and another Close To My Heart stamp design to go with it. 

I could really see adding a few rolled flowers to another version of this die cut....Aww my creative juices are flowing now!  Better get off this and get busy!
Until next time....
Becca

Saturday, December 17, 2011

Christmas Card 2011 Number 3

This was the first card I created and I am really please with how it turned out.  I cut all the shapes using my Cricut Art Philosophy Cartridge.  With over 700 shapes I truly could create cards for a year and not use them all!  Anyway, I found a design I liked and went with it.. ...I stitched around the background paper and attached it to my card base.  I then layered the other elements and added a bit of detail with my gel pen and glitter.  The Close To My Heart Stamp on the ornament is a design that works with the cartridge die cut.  That's one great thing about this cartridge is the stamp set that are designed to go with it!  Lot's of creative opportunities with that! 

Until next time..
Becca

Thursday, December 15, 2011

Resist Techniques on Christmas Card 2011 Number 2


I went a little technique crazy with this card.  I watch a ustream show with Tresa Black featuring various resist techniques.  Love, love, love it.  You can check out her video here

To create the card the first thing I did was emboss flowers on the brown background paper.  Then I used my blue ink pad to "wash" over the paper.  After cutting out my squares of Graphic 45 paper, I distress the edges and attched them to the card base.  On the cranberry cardstock I clear embossed the Christmas tress.  I then dry brushed white acrylic paint ove the image and used a baby wipe to clean off any excess paint on the tree image.  I used Glitter Glitz gel to add a bit of bling and then attached that peice to the card.  I used the same technique on the star.  To make the banner I used my cricut art philosphy cartridge to cut the shapes, used white ink to stamp the sentiment and my white gel pen to add the details.   

Well, I hope you enjoy looking

Until next time,
 Becca

Tuesday, December 13, 2011

Christmas Card 2011- Number 1

Just a few day until Christmas!  Wow!  I can hardly believe it...I guess we all say that as it rolls around.  I don't know why it's such a surprise...it happens the same time each year. 
Without a doubt,this is one of my favorite seasons.  I love it so much because it give me a chance to hang out with family and friends.  Spending time with them is one of the biggest joys in life I have.  "Time Spent" is definitely my love language. 
During Christmas season, I also set aside extra time to create.  Over the next few days I will post Christmas Cards I created and will mail to friends and family. 
Here's the first one

I didn't use any great techniques on this card...just a simple design with great papers and stamps.  The paper pack is Graphic 45!  I was thrilled when I found it at Hobby Lobby.  I thought the colors would work well for Christmas and I always go for the shabby look.  I used Close To My Heart stamps.  If you want to know which ones they are, just let me know.  I will be happy to look them up. 
Until next time,
Becca

Saturday, December 10, 2011

I have been really busy creating cards to send to volunteers who serve in CEF's After School program. These wonderful servants invest thier time, talent and enegry into the lives of boys and girls who may not otherwise hear about the love Christ has for them. I wanted to send them something special to acknowledge thier efforts.

Over the next few days, I will post a card that I created for them. This is card #3....

Ok, I had a blast with this card.  When I created it, I had just taken Tim Holtz workshop at my local scrapbook store and I was in the mood to get grungy!  I used a white card base and used distress inks to add color. 
I used a resist technique on the focal point panel...stamp your image with clear embossing powder onto white card stock, heat set, then use your distress tool, or sponge...whatever you have... to rub color on the paper.  The embossed area will resist the color.  See how pretty.  I decided to add a bit of bling...I know big surprise, huh? 
I created the focal image by using a layered stamp from CTMH that I bought years ago.  Love, love, love it! 
I hope you have enjoyed looking and I would love to hear your comments...let me know if you try the resist technique.
Until next time...
Becca

Wednesday, December 7, 2011

I have been really busy creating cards to send to volunteers who serve in CEF's After School program. These wonderful servants invest thier time, talent and enegry into the lives of boys and girls who may not otherwise hear about the love Christ has for them. I wanted to send them something special to acknowledge thier efforts.

Over the next few days, I will post a card that I created for them.  Here is card 3! 

This card is a very simple design with a lot of wow effect.  I used my copics to color my focal stamped image.  I then cut out the flower shape on my cricut.  I used a CTMH border to create the glitter border. This worked out great.  I pealed off the adhesive backing sprinkled it with glitter nad waala!  Instant glitter border!  It's beautiful and I wish you could see all the sparkly goodness up close.  I punched circles with my circle punch.  I then used a CTMH background stamp to add a bit of texture, cut them in half and added them to the bottom of  my card. 

I hope you have enjoyed looking and I would love to hear your comments.

Until next time....

Becca

Saturday, December 3, 2011

Thank you card 2 Cricut Art Philosophy

I have been really busy creating cards to send to volunteers who serve in CEF's After School program. These wonderful servants invest their time, talent and energy into the lives of boys and girls who may not otherwise hear about the love Christ has for them. I wanted to send them something special to acknowledge their efforts.

Over the next few days, I will post a card that I created for them.  Here is the second one I created...

I had lots of fun creating the fun shapes with my Cricut Art Philosophy Cartridge.  The cupcake and layered tag at the top of the page were both cut with my cricut and then stamped using the coordinating stamp sets that come with the cartridge.  I added a bit of glitter bling to the cupcake for icing and a flower from my stash.  The paper is pack of Graffic 45 that I pick up at Hobby Lobby. 

Until next time...

Becca

Thursday, December 1, 2011

Thank you card 1

I have been really busy creating cards to send to volunteers who serve in CEF's After School program.  These wonderful servants invest thier time, talent and enegry into the lives of boys and girls who may not otherwise hear about the love Christ has for them.  I wanted to send them something special to acknowledge thier efforts. 

Over the next few days, I will post a card that I created for them.  This is the first one....

I created the focal point by layering a couple of teabag folded papers.  I love this techique...there are so many wonderful layers and so much texture.  It really makes the card special.  I created the tiles for the folds by stamping and inking 2x2 squares of typing paper. 

The bird, butterfly and flower are CTMH stamps...if your interested in know which one's just let me know.  I cut the swirl and the background peice with cricut.  I used chocolate reinkier in my mini mister to add a bit of color to the pink cardstock. 

Well, I hope you enjoyed this post and I would love to hear your comments.  Check back in a few days for "Thank you card 2" 

Until next time....

Becca

Sunday, November 27, 2011

Ghirardelli Chocolate Boxes

I wanted to share with you a little something I put together yesterday for the volunteers who help at the After-School clubs. 

They'r little Ghirardelli Chocolate Boxes.  There is a great tutorial on the  Splitcoaststampers website.  The flower on top is made from scalloped circles.  Let me know if you would like to know how to make these. They're lots of fun to make and really add a lot of Wow! 
Let me know what you think.  I would love to hear your comments.
Until next time....
Becca

She Art Girl-It's Me!

I have learned so much from Christy as she has taken me through creating my own SheArt.  I have learned techniques and tried a few things that I probably would have never thought to use.  If your ready to try a few new things, highly recommend her Christy Tomlinson.  You will not be disappointed. 

During week 4 Christy takes us through how to personalize our girls.  This girl is me as a child. 
Christy challenged me to think back to my childhood and those people who influenced me and create a piece based on that.  Well, that was easy for me....I can't think about my childhood without thinking of my Mamaw Mattie. 
When I was about nine or ten, Mamaw made me a red poncho with tassels.  I still have it today!  Also, going to Mamaw's was always an adventure, she had a garden full of flowers and yummy things to eat.  And I also knew that I was special to Mamaw.  I have fond memories of spending the night with her.  I would always sleep with her and to help me relax she would rub my back and tell me to listen to the sounds waaaay off.  We always slept with the windows open and I could hear crickets, cars and they would lull me to sleep. 
Here's a close up to get a look at a few details.  I really like the way her hair turned out. 
I added orange paint to modeling paste to create the pumpkin.  Sorry it's so fuzzy. 

Well, I hope you've enjoyed looking and I would love to hear your comments

Until next time...

Becca

Tuesday, November 22, 2011

She Art Doll - Artsy Girl

I just realized that I haven't posted on my blog for a while.  I thought, while I'm up @ 4:30 in the morning with nothing to do I might as well do it now :)  So here goes...

I wanted to update you all on my she art doll art.  Please meet Artsy Girl....I know it's not very original.  This piece is all about texture, texture, texture! 
During the workshop, Christy took us through how to add layers of clothes and hats!  And take a look at that skirt...don't you love it?!  It was created by crinkling strips of paper and laying them on a skirt base.  I just love the way it turned out. 
 I can so relate to the quote on this piece.  As I was creating this I did feel as if my inner artist was free to go wherever it would take me.  In the end, I'm very please at how it turned out. 


Can you see the texture on the sun?  I did that by mixing yellow acrylic with modeling paste and spreading it out through a stencil.  Nice! 
Ok, enough of this...time to get creative.
Until, next time...

Becca

Saturday, November 12, 2011

An Award! Thanks Pam!

I was honored that my good friend and paper crafting companion, Pam Thorn, gave me the Liebster Blog award.  So sweet!  Pam is one of the most talented artist I know and I am always checking out her blog to see her latest for inspiration...you can check it out too at PJays Corner.  I know you'll be inspired. and Pam, thanks for the inspiration and the award!  Becca

Here's the award, and the rules for accepting this honor.


Liebster is a German word that means beloved or favorite. This award is only for blogs with fewer than 200 followers, so up-and-coming bloggers are recognized for their creative works!


Here are the rules to accept this award:

1. Thank the giver and link back to the blogger who gave it to you.
2. Reveal your top 5 picks and let them know by leaving a comment on their blog.
3. Copy and paste the award and rules on your blog.
4. Have faith that your followers will spread the love to other bloggers.
5. And most of all - have fun!


My Top 5 Picks, in no particular order are: 

Studio Scrapping  - if you've ever wanted to learn how to use Studio J, here's the place to be!  Lots of great techniques!

Cre8n Memories- Lots of great ideas and inspiration!

Angela's Art Journals  look here for lots of great techniques and wonderful inspiration.  Angela has great prompts to get your creative mind working

Its a Work of Art- wonderful works of art for lots of inspiration

Miraculous Mosquito have you wanted to learn how to doodle?  Check out this site to learn how.

I hope you check out all of these wonderful sites.  Until next time..

Happy Scrappin'

Becca

Sunday, October 23, 2011

SheArt Girl # 4

This a a pic of my SheArt Workshop Girl # 4 
This week Christy is showing us how to create layered dresses and hair pieces.  I did this piece in my art journal. 
I am having so much fun learning how to create these little beauties.  If you are interested in taking the workshop and learning how to create your own SheArt check out  Christy's blog. 
Well, off to my craft room to create girl # 5. 
Until next time...
Becca